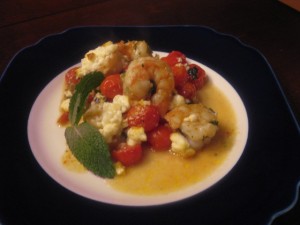
Baked Shrimp with Tomato & Feta

What can I say?  Once again, Martha’s people inspiring me.   This is so easy, delicious, and a little outside of the box.  Throw it together in no time.   I usually change a few things in a recipe, but I had a hard time needing to fuss about this one. I just changed a few things that were minor – but  I’ve made it several times now, and never seem to change it much.  One thing I think is crucial to change, though, is to season the shrimp with salt and pepper before cooking.  There is salt in feta cheese, but the shrimp itself was a bit bland until I started to lightly season it before cooking.

For a family of four,

Gather This:

  • 2 tablespoons olive oil
  • 4 thinly sliced scallions
  • 3 garlic cloves, thinly sliced
  • 2 teaspoons dried Italian seasoning
  • 2 pints cherry tomatoes, halved – or about 6-8 plum tomatoes, cut into large dice
  • Coarse salt and ground pepper
  • 1 1/2 pounds peeled and deveined large frozen shrimp, thawed, tails removed
  • 2 tablespoons chopped fresh fresh mint, plus more for garnish
  • 4 ounces feta cheese

Do This:

  1. Preheat oven to 475 degrees with rack set in upper third. Heat oil in a large skillet over medium. Add scallions, garlic, and Italian seasoning; cook, stirring, until fragrant, about 1 minute.
  2. Add tomatoes. Cook over medium, stirring occasionally, until no liquid remains in skillet, 10 to 15 minutes. Season with salt and pepper.
  3. Add shrimp and mint to skillet. Stir to combine; transfer to an 8-inch square (or other shallow 2-quart) baking dish. Crumble feta over top.
  4. Bake until liquid is bubbling, cheese is beginning to brown, and shrimp in center of dish are opaque, 15 to 20 minutes. Serve with a light side of whole-wheat pasta, tossed with olive oil and lemon; and sprinkled with additional chopped mint.  If you’re in phase one of South Beach – just use some cooked green beans or asparagus tossed with olive oil and lemon and garlic for a great side.

The only other change I can think of making is that I use an oven-proof, non-stick skillet so that I don’t have to fuss with transferring to another dish and consequently cleaning more.  🙂    Please, if you’re going to skip the mint – don’t bother with the recipe! It’s the make or break, in my opinion.  What a great way to start off a low-carb diet!  That being said, this dish would also benefit from some delicious vesuvio-style roasted potatoes… mmmm!

This is the original recipe from Martha’s site: Baked Shrimp with Tomato and Feta .   It’s one of many recipes from a magazine I love, Everyday Food (Martha Stewart).  I’ve gotten it for the last four years.  If you’re looking for easy recipes like this you need to fork out the $15 for the best collection. Beautiful photos that inspire you to cook.  Are you kidding?  For me, food is so visual.  That’s why I’m trying to improve my photo skills for this blog.   Get this great book here:

 Everyday Food Great Food Fast

<iframe src=”http://rcm.amazon.com/e/cm?t=recipereporterblog-20&o=1&p=8&l=as1&asins=0307354164&fc1=000000&IS2=1&lt1=_blank&m=amazon&lc1=0000FF&bc1=000000&bg1=FFFFFF&f=ifr” style=”width:120px;height:240px;” scrolling=”no” marginwidth=”0″ marginheight=”0″ frameborder=”0″>

Sorry, WordPress doesn’t let me paste a really cute looking ad here so the link will have to do.  Just take my word for it that this is a great investment! You will love this book.

Leave a comment

Filed under Culinary Chit Chat, Healthy Recipes, Quick & Easy, South Beach Phase 1

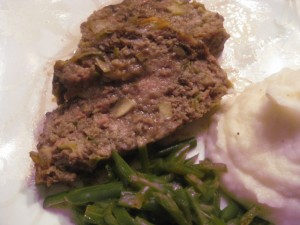
Fabulous Meatloaf with Italian Cheese & Mushrooms

What, you say?  “Fabulous” and “Meatloaf” seemingly don’t belong in the same title.  Once you try this, you’ll change your mind.  It’s EASY, but actually on my list of company-worthy – one I intend to serve to French guests that are expected in July. It’s a wonderful blend of  U.S. meets Euro.  My camera failed me on this one, so you’ll have to take my word for it that it was nice to look at, too.  Not counting the 45 minute cooking time – thrown together in a few minutes.

The original recipe was this:  Turkey Meatloaf with Fontina and Mushrooms .  Martha’s people, as usual, rocking my culinary interests.  But for me, I needed to make it a bit more kid-friendly, and the ingredients a little more budget-friendly and mainstream. The result was even better!

Gather This:

  • 3 tablespoons olive oil
    • 1/2 pound white button or cremini mushrooms, chopped fine so the kiddos don’t recognize it
    • Coarse salt and ground pepper
    • 2 small leeks, white and light-green parts only, cut in half lengthwise, thinly sliced crosswise, washed, dried
    • 2 garlic cloves, minced
    • 1 cup shredded Italian cheese blend, such as mozzarella, provolone, romano, parmesan, asiago)
    • 1 slice day-old bread, crumbled into coarse crumbs (no canister crumbs here!)
    • 1 large egg
    • 1 tablespoon finely chopped fresh sage leaves, or 1/2 teaspoon dried rubbed sage
    • 1 1/2 pounds ground meat, I use a combination of pork and beef.  If you use turkey, make sure it’s the higher fat ground turkey to get the best flavor and proper texture.

    Do This:

    1. Preheat oven to 350 degrees. In a large skillet, heat 2 tablespoons olive oil over medium-high. Cook mushrooms, stirring occasionally, until deep golden brown, about 5-7 minutes. Season with salt and pepper; transfer to a large mixing bowl.
    2. Return skillet to medium-low and add another tablespoon oil.  Add leeks and garlic and cook, stirring occasionally, until soft, about 5 minutes; season with salt and pepper. Add to bowl with mushrooms and let cool.
    3. Add cheese, bread, egg, and sage to bowl and mix until thoroughly combined. Mix in ground meats, 3/4 teaspoon salt, and 1/4 teaspoon pepper. In a ceramic or glass casserole (I use one that’s about 8×11), use your hands to form the mixture into a 10-inch loaf. Bake until cooked through, about 45-50 minutes. Let rest , loosely covered with foil, 10 minutes before serving. Drain off any fat and slice in 1/2 inch portions.

    Serve this the traditional way – with green beans and mashers, but when company comes (and yes! I definitely serve this meatloaf to company) I kick up the green beans and do French haricots (tiny whole green beans) and toss them with butter, lemon zest, pine nuts, and lots of salt and pepper – and then I drizzle the mashed potatoes with a little truffle oil.   You won’t need gravy, because the meatloaf is so flavorful and moist.  But if you must do anything, use just a light red-wine based juice deglaze type sauce – a heavy beef gravy would just destroy it.  You could possibly use a very light tomato sauce because it would be in keeping with the Italian influence of the dish.  But unless your guests are under 10, NO KETCHUP ALLOWED!

    Leave a comment

    Filed under Budget Friendly, From My Own Kitchen, Italian-inspired, Kids Favorites, Quick & Easy

    Romantic Interlude: A Menu with Butternut Squash, Scallops, Asparagus, & Truffle

    Romance was in the air, and we had a beautiful 1999 Veuve Clicquot Ponsardin champagne,  given to us in November by dear friends of ours, that needed to be made good use of.  My husband and I have had two failed attempts to go out for Valentine’s Day, due to sick kiddos and shortage of babysitters.  Alas, we resolved ourselves to celebrating at home, until such time as I am lucky enough to be served by someone else.

    So, I surfed my usual recipe pages for something elegant and sophisticated, yet not to hard on the budget or difficult.  Scallops are a favorite shellfish for both of us; so I stumbled upon this recipe at the food network site:

    Scallop and Truffle Mille-Feuille with Meyer Lemon Creme Fraiche and Truffle Vinaigrette

    Names never scare me.  I knew that anything Emeril doctored up that I could barely pronounce had potential.  Sure, it called for truffles – and a couple of years ago I would have made the trip to Whole Foods to spend the $25.00 for the jar.  But I had some truffle oil in the cabinet which would do just fine for these tight-wad times of 2010.

    For those of you unfamiliar, a truffle is a  delectable mushroom that is difficult to harvest, is grown in only a few places in the world, (mainly France) and therefore, costs about your monthly payment to your IRA.  Not to be confused with a chocolate truffle – which is a chocolatiers’ delicious sweet knockoff of the real thing.

    This dish was superb. I changed quite a few things though, to make it easier, less expensive, and less time-consuming.

    This is what I did differently:

    1. I used regular lemons instead of Meyer lemons, because that’s all my store had.

    2. I didn’t use any truffles. Instead, I very thinly sliced a few fresh baby portobellos (cremini mushrooms) for the presentation. Then, I used my black truffle oil to make the dressing and drizzled a little extra over the whole thing at the end.

    3.  I didn’t buy puff pastry.  Instead, I happened to have some leftover phyllo dough sheets in my refrigerator from a recipe I had done over New Year’s.  Using a heart-shaped large cookie cutter, cut out a few stacks of heart-shaped dough, about 6 inches in diameter.  Then I quickly separated the heart phyllo sheets into stacks of two or three sheets on the baking sheet as per Emeril’s directions.   I brushed the tops of the hearts with a little butter melted in the microwave.  Then I baked them only for about 5 minutes or so. It’s a good thing I checked the baking hearts then, because phyllo is much thinner than puff pastry and I hadn’t accounted for that.  Lucky!  They were just golden and crispy.

    4. I used tin foil in place of parchment paper for baking the heart stacks.

    5.  I went on a wild goose chase to find Enoki mushrooms.  Normally, I would have prepared ahead of time, and found them easily at Whole Foods or Trader Joe’s.  But this was a whim, so after visits to three major grocery stores within a square mile in twenty minutes – I finally found them at the fourth , a stinky Vietnamese market.  The shrooms were fresh. That’s all that mattered.  And it was the one ingredient I wasn’t willing to sacrifice – because it made the presentation.

    6. No creme fraiche available at my local stores.  Instead, whole greek-style, plain yogurt was an equally delicious and a healthier substitute.

    7. For the dressing, I used some of the fabulous champagne and white vinegar instead of store-bought champagne vinegar.  about a 2:1 ratio. You could use a dry white wine with good results.

    Butternut Squash Soup with Fontina Cheese Crostini

    We wanted a light dinner, but the scallop recipe just seemed a little too light – and while I was inspired by the dish’s sophistication,  I decided to do a soup for a first course so we wouldn’t be hungry afterward -as sometimes happens after a light and sophisticated meal.   In keeping with new commitment to health during Lent, I opted for a butternut squash soup from Giada DeLaurentis; she rarely lets me down, and I thought the texture would be creamy enough to satisfy my fat craving.

    It originally was written to serve six as a first course, so I figured I could cut it in half and maybe still have a cup left for the kids to try the next day.  Besides, I was going the lazy way at the store – didn’t want an extra 15 minutes prep time cutting up squash –  and more than two bags of pre-cut butternut squash was just too expensive. When I got to the store, the only pre-cut squash was with a cinnamon sauce – but I could see from the bag, that  it was just a chunk of brown sugar that would melt upon heating.  So I just opened the bags and discarded the chunks of  cinnamon sugar and voila – I had pre-cut, unseasoned butternut squash for my recipe.

    Otherwise, I followed the recipe to the letter – which is unusual for me, and it was PERFECT.  I’m not kidding you.   My husband said it was so fine, smooth, and velvety, and assumed it took a long time to make (it didn’t).   It was healthy and creamy, without an ounce of cream.  Unbelievable.  I was surprised by the ease with which this came together.    And, it could easily be a light supper, all on its own – perhaps even vegetarian, if vegetable stock were used instead of chicken stock.

    A quick, traditional, French appetizer

    Whenever I do a fancy dinner at home for the two of us, I like to do a very light appetizer or an amuse-bouche. We are lucky enough to have a new, authentic French (Basque-style) deli nearby, so we happened to have a wonderful country-style pate in the fridge. Then remembering that my mom had given me some small, vintage aspic cutters a long time ago, I was inspired to again incorporate the Valentine’s day theme.

    I carmelized a few onions and added a little brown sugar to them to garnish the appetizer, and served the pate in the traditional way with some grainy Dijon mustard and toast points.

    To round out the meal, my husband had also bought – in honor of our late celebration – some fabulous chocolate mousse and fresh pear pastries from the French guy at the deli.  It’s a good thing, because while I love to cook, I’m not one for making desserts.

    When it was all said and done, this was a fabulous Valentine’s day celebration.  I wish I had taken photos of the beautiful dessert that DH had brought home for us, but I had been preparing our dinner for two hours, blogging simultaneously, and it was 9:30 pm by the time we got to dessert… so you’ll just have to imagine how pretty it was.

    Here were the courses that I prepared, finished:

    1 Comment

    Filed under Culinary Chit Chat, Healthy Recipes

    Tilapia Tacos with Cilantro Slaw

    Tasty, impressive,  healthy, budget-worthy, kid-friendly!  I gathered ideas from a few different recipes and made it into my own.  Every time I make it, yums and ahs abound.  Next time your family is screaming for tacos – see what happens with this.

    GATHER THIS:

    • 1-3/4 pounds tilapia, about 4 fillets, cut into 2″x1/2″ pieces
    • 1 cup fresh bread, panko, or cracker crumbs, or a combination (I used 10 saltine crackers and 2 pieces of whole wheat bread this time)
    • 1 egg, lightly beaten
    • 1 tablespoon water
    • 1 teaspoon creole or taco seasoning (I like Emeril’s Essence)
    • 3 tablespoons vegetable oil
    • 1/4 cup light mayonnaise
    • 1/4 cup light sour cream (Daisy is the best)
    • juice of one small lime (fresh only please!)
    • 2 teaspoons white sugar, or sugar substitute – more or less to taste
    • 3 cups loosely packed shredded coleslaw, romaine, iceberg,  or a mix of any of these
    • 4 scallions, tops removed, sliced 1/4″ diagonally
    • 3 tablespoons chopped fresh cilantro
    • Warm corn tortillas, about 8 (see note below)

    DO THIS:

    Place the breadcrumb/saltine mixture in a shallow dish.  In a small bowl, whisk together the egg, water, and taco seasoning.   Pat the tilapia pieces dry with a paper towel, and then season them with salt and pepper.  Working with a few pieces at a time, first dip the fish in the egg, letting the excess drip off; then coat the fish pieces well with the breadcrumb mixture.  Place the coated pieces on a clean plate. Repeat until all the fish is coated.

    Try and use one hand for dipping the fish in the egg mixture and the other for the bread; this will prevent a gooey mess on your fingers (or the fish pieces). I read this over and over on all the recipes ever done with breading, but inevitably, I wind up with goo somehow!  One day I will master this coordinated effort…

    Now heat two tablespoons of the vegetable oil in a large, non-stick skillet over medium heat. When hot enough to sizzle from a drop of water, add half of the coated fish pieces to the skillet.  Fry the fish pieces for about two minutes on each side, until golden and crispy.  Transfer the cooked fish to a warm plate lined with paper towels.  Cover loosely with foil while you fry the second batch.  Add the remaining tablespoon of oil, if needed, and repeat the process with the remaining fish pieces.

    While the fish is cooking, you can be preparing the slaw topping:

    In a medium bowl, whisk together the mayonnaise, sour cream, lime juice, sugar, and salt and pepper to taste. Stir in the coleslaw, green onions, and cilantro.

    To serve, assemble tacos with two or three pieces of fish in a warm corn tortilla, topped with a tablespoon or two of the slaw topping.   On the side I always serve black beans with some grated Mexican cheese called cotija, but crumbled parmesan or romano works equally well.  And, if you want the kiddies on board (my kids love the fish tacos, one of them without the slaw..) serve with refried beans topped with shredded cheddar.  A great way to get them to eat fish that is not processed!

    TORTILLAS: Two ways to warm!

    For over-the-top excellent taste and texture, use your non-stick skillet with a tiny bit of oil to toast the tortillas – then stack them in tin foil to keep them warm for serving.  This takes a little time, but is so much better than the alternative!  Seriously, you made these great fish tacos, don’t shortcut the wrapping.

    But, if you’ve absolutely had it and time has run out –  the alternative is:

    Wrap about 8-10 corn tortillas in damp paper towels; heat in microwave for 20 seconds.  With this step, I could put this recipe on the “quick and easy” category or tag list, but I chose not to, if you really want it to be great spend the extra five or ten minutes!

    3 Comments

    Filed under Budget Friendly, From My Own Kitchen, Healthy Recipes, Kids Favorites, Mexican-inspired

    Super-Quick, Fantastic Greek Chicken Cutlets

    We are South-Beaching it for a few weeks here at the homestead.  After the Super Bowl every year, my husband and I go on our “annual diet” – because we tend to pack on the poundage during the holidays.

    We don’t have a regular recipe rotation in our house.  But there are a few recipes that I make, repeatedly – when the mood strikes – because they are just great and easy to make when you’re in a hurry.  This one is on my top ten list.  Best of all, it’s great for high-protein dieting and the first phase of South Beach.   This recipe was originally printed in Martha Stewart’s Everyday Food Magazine in April of 2007, one of my favorite cooking magazines, recipes from which you will see me blog about frequently.

    GATHER THIS:

    • 1 pint cherry or grape tomatoes, halved
    • 1/3 cup pitted Kalamata olives
    • 4 ounces feta cheese, coarsely crumbled (1 cup)
    • 1/2 cup fresh mint leaves
    • 2 to 3 tablespoons olive oil
    • Coarse salt and ground pepper
    • 1 1/2 pounds thin chicken cutlets (about 8 )

    DO THIS:

    1. In a medium bowl, combine tomatoes, olives, feta, mint, and 1 tablespoon oil. Season with salt and pepper; set aside.
    2. Heat a grill pan over high; brush lightly with oil. Season cutlets with salt and pepper. Cook, working in batches as necessary, until chicken is cooked through, 1 to 2 minutes per side. Transfer to a plate, and cover with aluminum foil to keep warm. Top chicken with tomato mixture, and serve.

    From Everyday Food, April 2007  – Serves 4

    What’s good about this is its simple sophistication, but you can easily set aside one of the cooked cutlets and serve it with some noodles and another veggie for the kiddos.

    In the first phase of South Beach, I am usually starving – so I bulk it up with some chopped cucumber and up the ratio of oil and sprinkle some lemon juice over the whole deal for added kick.

    For accompaniments, I serve it with good-quality hummus (I like Trader Joe’s, Tribe or Sabra) and some extra low-carb veggies for dipping.   If you’re not in the first phase, a good, healthy side dish would be some whole-wheat couscous cooked in chicken broth and tossed with olive oil, lemon juice and some fresh chopped scallions.   This recipe will do alright with fresh parsley or cilantro instead of mint – but it will knock your socks off with the mint!

    1 Comment

    Filed under Budget Friendly, Healthy Recipes, Quick & Easy, South Beach Phase 1

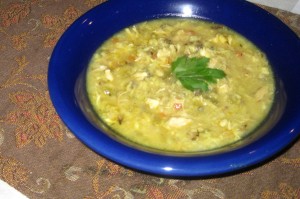
    Over the Top Chicken & Wild Rice Soup

    It’s a snowy day, my three year old has a cold, and my husband has been working outside – so I thought it would be a perfect day to do some kind of chicken soup in the crockpot.  I have some wild rice in the pantry leftover from another dish, so I thought I would take a stab at a chicken and wild rice soup.

    Now, you’d think it would be easy to find a recipe such as this.  I suppose it is, if you have vanilla tastes and you don’t want anything more than ordinary.  I like a little creaminess to my chicken soup – or at least, a little extra kick.  I like lemon, curry, coriander, ginger, or something beyond Grandma’s recipe. Plus, today I wasn’t able to get to the store for any special ingredients.

    I spent about Over the top!40 minutes looking in my books and perusing the website with no success.  There’s probably one out there that’s as good.  But if I was going to get cooking I had to get off the computer and begin.  I found some inspiration from this:

    http://www.foodnetwork.com/recipes/food-network-kitchens/chicken-and-rice-soup-recipe/index.html

    But it still wasn’t all I wanted in a Chicken and Wild Rice Soup recipe.

    So, I did my own – and this is what I came up with (don’t be afraid of the long ingredient list, most of them you just throw in):

    GATHER THIS:

    • Any combination of 6-8 pieces of bone-in, skin-on chicken
    • Vegetable oil & 2 Tbls. butter
    • 2 stalks celery, diced finely
    • 2 small carrots, diced finely
    • 1 very small onion, diced finely
    • 2 tablespoons flour – I actually used Wondra!
    • 2 cloves garlic, minced
    • 6 cups chicken stock, low-sodium, or 6 cups water with 5 teaspoons chicken bouillon powder
    • 1/2  package (3 oz.) Near East Long Grain & Wild Rice Original, seasoning packet removed
    • 3-4 whole sprigs fresh parsley, tied together
    • 1/2 teaspoon dried thyme
    • 1 teaspoon turmeric
    • 1 teaspoon cumin
    • 1 bay leaf
    • dash or more of cayenne pepper

    DO THIS:

    Season the chicken pieces with salt and pepper.  Heat a large skillet over medium heat, and add 1 tbl. oil and 1 tbl. butter.  Sear the chicken pieces in the skillet in two separate batches, about 5-6 minutes per side, to get a nice browning.*  Place the browned chicken pieces in the bottom of the slow cooker.

    Wipe out the skillet, lower the heat to medium-low,  then add the rest of the butter and just a teaspoon of oil. Cook the celery, carrot and onion in the skillet for about 5 minutes or until just soft.  Stir in the flour, season with 1/2 teaspoon salt and 1/4 teaspoon fresh black pepper, and remove from heat.

    Transfer the vegetable mixture into the crockpot with the chicken.  Add the minced garlic, rice, and pour the chicken stock over everything. Add the parsley, turmeric, cumin, thyme, and bay leaf. Stir gently.

    Cook, covered, in the crockpot 1 hour on high.  After one hour, reduce heat to low, and cook an additional 2-3 hours.  At some point, and really, any time after the first hour – you’ll take the chicken pieces out, let them cool a bit, and then bone the chicken.  Remove the skin, of course.  Then chop up the  cooked chicken rather fine – this is a good way to ensure no one gets a bone in their bowl.   You should have about 2 cups of chicken.   Return the chicken to the pot,  and now add the cayenne pepper to taste.  Replace the lid and heat through for the remaining cooking time – or if you wait until the end to bone the chicken, reheat for about 10-15 minutes.

    Before serving, remove the bay leaf and tied parsley. Taste again for salt and pepper seasoning (I added more here).   Finish by stirring in the lemon juice just before spooning into bowls. Then grab a snuggie, some crusty bread or oyster crackers,  and a glass of chardonnay – you are well on your way to comfort heaven.

    MY REVIEW:

    Wow! This surpassed all my expectations.  This was family friendly, it had everything going for it.  I’m not sure I would change anything, except perhaps to add the rice a little later in the recipe – maybe after that first hour in.  I didn’t mind it soft, but I do like my wild rice to have just a little resistance to the tooth. And, though I was craving something creamy, this didn’t need it.  It was rich and delicious, without being too unhealthy.  I was really glad I ditched the written recipes and did my own thing here.  When I do this again, (and I will) I’ll try just keeping the crockpot on low the whole time, for a longer time – to see if it would withstand being gone most of the day.  Try it and tell me what you think!

    Leave a comment

    Filed under Budget Friendly, From My Own Kitchen, Kids Favorites, Low & Slow

    Premier Recipe: Julia’s BOEUF BOURGUIGNON

    The first thing I think of whenever I see this recipe is “how did they manage to put so many vowels in those words?”, and I usually have to look at it to type it or I’ll spell it wrong. This recipe is not for the faint of heart – there is an ample amount of animal fat, oil, and butter. DH and I are intending to begin a new regime this week, so we figured we may as well get the last culinary “hurrah” before we have to lay off the fat stuff for a while.

    I’ll preface today’s post by saying that the majority of recipes I intend to blog about won’t be nearly as rich and complicated, primarily because I just won’t have time for long posts like this on a regular basis – and, because most of us don’t have time to make recipes like this frequently – I suspect I’d lose you. But since the inspiration for me began with the story of the blogger taking a culinary journey with Julia – it seems only appropriate to begin our journey with the famed French recipe for Beef Stewed in Wine.  It’s not difficult. It’s just got a few steps, and takes a little time. Save it for the weekend, when you can be doing laundry or playing with kids between steps.

    For the recipe, I’m paraphrasing here from Julia Child’s version in the “French Chef Cookbook” (her version is a little wordy). I simplified it a bit but tried not to lose any of the integrity of the real deal.

    GATHER THIS:

    • 3 lbs. stew meat, or a chuck roast cut into 1-1/2 inch pieces
    • 6 oz. of lean salt pork, pork belly, or fresh (not smoked) bacon, cut into 1×1/4 inch pieces. If you must, you can substitute thick-sliced smoked bacon, cut up.
    • Vegetable oil
    • A few tablespoons of butter, we’ll divide it up as we go
    • 3 cups of a good tasting Pinot Noir (doesn’t have to be expensive
    • 1-2 tbl. Of tomato paste
    • 3 cloves smashed garlic
    • ½ teaspoon dried thyme
    • 1 bay leaf
    • 1 lb. fresh mushroom, quartered and stems trimmed
    • 18 white pearl onions, peeled (or a 10-oz. box of frozen pearl onions, already peeled – much easier!)

    DO THIS:The Big Finish
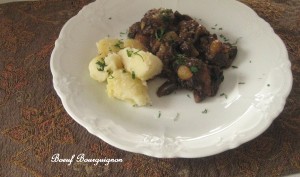
    Once all you have your ingredients ready in one spot, preheat your oven to 325F. Over medium-high heat, fry the lardons (bacon pieces) in a large skillet (I like non-stick for this) until browned. Remove the pieces with a slotted spoon, and set aside. Then add about a tablespoon of vegetable oil to the skillet so you’ve got a good covering of fats on the bottom. In two batches, brown the meat on all sides a couple of minutes. Then place each batch of browned meat into an ovenproof casserole dish, ideally one that has a cover (or you can use foil).

    When the meat is browned and transferred to your casserole, drain the excess fat from the skillet but don’t wipe it – leave the brown bits at the bottom. Put the pan back on the heat and pour in the wine, scraping up any bits and goodness at the bottom. Pour the wine from the skillet into the casserole, and add enough beef stock to almost cover the meat. Then add your tomato paste, mashed garlic, thyme, bay leaf. It didn’t say exactly whether or not to mix it in, so I just gently loosened up the paste in the broth and moved it and the thyme around the liquid a bit. Save the skillet for the next step.  Bring the stew to a simmer on the stovetop. Then cover the casserole, and put it in the preheated oven for at least 2-1/2 hours. I did mine for 3-1/4, but I like it falling apart.

    While the stew is cooking, sauté mushrooms in a tablespoon each of butter and vegetable oil. Season with salt, then transfer to a small bowl and set aside. In the same skillet, add one more tablespoon of butter, the peeled onions, and enough water to cover the bottom of the pan. Bring to a simmer, cover the skillet, and cook the onions until nice and soft. Remove from heat and set aside.

    Now, I could go on with another couple of steps that were in the original recipe, but in my estimation, it would have taken twice as long for the same result. I’m sure a French culinary authenticist would argue, but I have a family, and extra steps for the sake of tradition are just not in my schedule. So, here’s what I did to finish the dish and the sauce:

    About 15 minutes before you are ready to serve, add the prepared onions and mushrooms to the casserole. Gently mix them into the cooking juices and return the casserole to the oven until they are just heated through, about 5-10 minutes. Then, pour the cooking liquid from the casserole into a gravy separator, if you have one. Add enough stock to make 2-1/4 full cups of liquid. Spoon off excess fat or let it stay in the separator when you add the rest to the sauce.

    In a small saucepan over medium heat, melt 3 tablespoons of butter. Add 3 tablespoons of flour, whisk and cook until blended about 1-2 minutes. Then, slowly whisking, gradually add the de-fatted cooking liquid, a few tablespoons at a time, until all is incorporated. Bring to just a boil until beginning to thicken, lower heat and simmer for 5 minutes. Season well with coarse salt and fresh ground pepper, and taste. Since you haven’t added any salt and pepper to the stew yet, the sauce will serve as the seasoning.

    When the sauce is done, make sure the rest of the fat has been drained out of the casserole, and then add the sauce to the cooked stew. Mix around gently and heat on the stove top for a minute or two. Taste again and adjust seasonings. Keep warm until serving. IT’S DONE!

    MY REVIEW:

    Was it worth it?

    Definitely!  Actually, I was surprised. Any kind of beef stew is not really my favorite meal. This was absolutely spectacular.  I wouldn’t have done anything differently, than what I mentioned above.     According to my French husband,  I passed the test of authenticity test, spot on. Yay for me!  I’ll be honest, though. It will probably be another year before I make it again, and I would invite company to appreciate it for all the time it took.  Oh, and did I mention, the dish has romance written all over it, especially if your guy is a “meat and potatoes” man.  So, if you’re looking to hook one in, this might be a contender…

    I’ve always exposed my kids to everything I cook, so they can tolerate more flavor than most kids that are accustomed to a weekly mac and cheese diet.  They still didn’t gobble it up – so this will not get a ‘kid-friendly’ recipe tag.  My husband and I, however, had no problem. I served it with parsley buttered boiled potatoes, and a green salad and crusty artisan bread – traditional as told to me by both the book and my husband.

    What I would change:

    First, you should know that DH and I had ordered part of a cow this year for our supply of red meat, (the most delicious I’ve ever tasted!) so I used a chuck roast – trimmed the meat off the bone as close as I could, and then cut it into large stew chunks. I kept used the smaller bone pieces to retain the flavor from them and discarded the longest one because it didn’t fit nicely in the pan. If you don’t know this, the marrow from the bone of the cow is succulent (some gourmet restaurants even serve it as a dish). So don’t throw the bones away until after you cooked the stew with it!

    I thought I was lucky to find pork bellies in my grocery store – which is the original ingredient used in place of bacon.  But, it turned into a lot of wasted time. I found it to be difficult to cut up – ended up using kitchen shears, and mid-way through frying them, I realized they needed to be smaller in order to brown, so I frantically was cutting them smaller while they were in the pan.   I would stick to ready-made fresh bacon, if you can find it, that isn’t smoked – or use regular bacon and simmer it for a few minutes immersed in water to get the smoky flavor out (as recommended by Julia).  Then dry it with a few paper towels, and fry it up as you would.  If you are just not up for the extra step – I’ve used smoked before in other recipes for this with fine results – it’s just not as traditional, and truly, the flavor is not as completely delicious.

    I had already begun this recipe before I realized the only wine left in the house was a simple Columbia Crest drinking merlot, not the finer pinot noir (or burgundy) that it calls for.  But, unless I wanted dinner to be served at 9pm – I had to proceed, and at least it was a younger red.   So in went the merlot and after the casserole was already in the oven I had DH run out and get a proper wine to at least drink with the dinner.

    Another thing I changed is to reduce the wine to 2 cups, and replace it with another cup of stock, which by the way, I only had chicken stock in the house too.  This toned down the wine flavor just enough so that the kids would taste it without making a face – because 3 cups really is a lot of wine flavor, even for me, and I have a very high threshold for wine consumption 😉 .  The chicken stock was perfect –  a bit lighter and allowed the flavor of the true beef to come out instead of being masked with the heavy taste of beef stock. Perhaps were I not using top quality beef from a butcher, it would have needed the extra beef flavor.

    Rating with Recipe Reviewer’s Changes: 5 Stars

    1 Comment

    Filed under French Recipes, Low & Slow

    Follow Me on a Culinary Journey!

    I’m beginning this blog for a number of reasons.  But mainly, what I’ll do is to write about new recipes, and review them – every week.  I’ll tell you if you shouldn’t bother, or if you should invite the neighborhood to dinner.  Feeling brave? Send me one of your own.  I might try it – just be sure you’re ready to hear the truth – good or bad.

    I’ve been inspired, recently, by watching the movie, “Julie and Julia”.  If you haven’t seen this, and you love to cook – it’s a must.  Not only did I love the movie for its content – the loosely depicted biography of Julia Child, Meryl Streep in all her glory, humor throughout – but I so strongly identified with the character Amy Adams’ character Julie,  who blogged about her culinary journey – that I was compelled to do something similar.  The French cultural reference is also near and dear to me, since I’m married to a French native who appreciates all my kitchen adventures.  But I’m not here to blog solely about French food – that’s much too limiting for me.

    Like the character Julie in the movie – I, too, never seem to finish anything significant.  I have a happy marriage, two beautiful boys, and I work at home. Before that, I had relative success with mid-level careers. Those are the long term things. But I’ve also attempted writing a low-carb cookbook, a custom recipe-creating service,  a parents’ website, a free-lance writing career – all of which I didn’t complete, or haven’t been consistent about.

    Life is crazy for my little Midwestern family. The economy is in the crapper, our business income has declined, healthcare costs are unmanageable, and, like a lot of parents, I’ve been trying to find the perfect part-time job that will accommodate my family lifestyle. I’ve diagnosed myself with adult ADD, and in my constantly sidetracked, overwhelmed perfectionist state of mind, the only thing I seem to be able to focus on is a short term task. Our life is very stressful right now.  I’m just trying to get through the day. Every few months I say to myself, “what do I want to be when I grow up?”  I still don’t know the answer. But, there is one thing that I am consistent about throughout my life:  COOKING SOMETHING NEW.

    Whether I am single, married, younger, older, childless, parenting, dieting, binging, entertaining, working, staying at home, richer, or poorer – I take great joy in burying myself  in the creation of Giada’s Osso Buco, or Martha’s Greek Chicken Cutlets, or re-creating the look of some fabulous food photograph I saw in the latest cuisine magazine.  I look for ways to make them easier, yummier, more budget-friendly, more kid-friendly.  It’s something I do almost every day, and something I can write about, because I also love to write.  Cooking has held my interest all these years, because the act of completing a recipe is short term, so I’m able to focus on it. It gives me a sense of control and accomplishment, quickly – the needed fix for someone who is normally in a state of perpetual self-doubt. It can change with me, no matter what’s going on in my life.  I need cooking something new like a band-aid needs a cut. (huh? can someone give me a metaphor here?)

    And so, for now, I can write about what I love, and maybe some readers will enjoy it.  Perhaps I can inspire you to try something new and break out of your ‘Wednesday is spaghetti night’ habit.  Or maybe, a reader will even challenge me.  Weekly recipe rotation is non-existent in my home.  And, even the family standbys are re-worked, revised, or improved every time I make them.

    Come and take a culinary journey with me! Every week will be a new adventure.  I’ll try recipes from books, magazines, websites, my family, well-known chefs, and myself.  This is meant to be fun, but I’ll give you the truth, no matter what.  That may include ripping an occasionally recipe to shreds, if it’s deserved. But for the most part, you can count on reading about something great to make – with a few hints or tweaks from me to make things easier or better than what is written!

    Leave a comment

    Filed under Culinary Chit Chat